Overview
Ashenex Steam Publisher replaces the usual juggling act of cooking your project, copying outputs, hand-editing app_build.vdf and depot_build_*.vdf files, and dropping into a terminal to run steamcmd. The entire pipeline runs from one button in the Unreal toolbar.
The plugin generates the Steam build scripts for you from values you fill in inside the editor, downloads steamcmd on first run, drives the cook, stage, and package phases through Unreal's standard packaging pipeline, then hands the resulting build off to Steam. A live progress window mirrors every phase as it happens, and a per-project Build History tracks the last ten publish outcomes.
steamcmd, and a Cancel button that's always available..vdf install script if needed.app_build.vdf and depot_build_*.vdf files from your settings, including the Desc and SetLive slots.default at the editor layer to prevent accidents.steamcmd session, results reported via editor notification..json file.steamcmd from Valve on first run. No manual SDK setup.EditorPerProjectUserSettings.ini.Installation
Ashenex Steam Publisher can be installed via Fab through the Epic Games Launcher, or manually by dropping the plugin folder into your project. Either way, the plugin runs only in the editor, it does not add any runtime cost to your packaged game.
- Acquire Ashenex Steam Publisher from your Fab library in the Epic Games Launcher.
- Install it to the engine version you are targeting.
- Open your project in Unreal Engine.
- Go to Edit → Plugins.
- Under the Ashenex Interactive category, enable Ashenex Steam Publisher.
- Restart the editor when prompted.
- Download the plugin package.
- Create a
Pluginsfolder in your project root if one doesn't exist. - Copy the plugin folder into:
YourProject/Plugins/AshenexSteamPublisher - Open the project. If prompted to rebuild the plugin from source, click Yes.
- Confirm the plugin is enabled in Edit → Plugins → Ashenex Interactive.
- You should see a new Package and Push to Steam button in the level editor toolbar.
Ashenex Steam Publisher targets Unreal Engine 5.
Steamworks Setup
Before the plugin can publish anything, your title needs to exist on the Steamworks side. This is a one-time setup that takes about 15 minutes if you already have a Steamworks Partner account, longer if you're starting from scratch.
partner.steamgames.com and pay Valve's one-time Steam Direct fee for your title.AppID + 1 for your first depot).internal-qa, beta) under Steamworks → Builds → Manage Branches before publishing.Every upload requires Steam Guard two-factor authentication. Make sure you can receive the code (email or Steam Mobile Authenticator) before clicking Package & Publish. The plugin will prompt you with a popup to enter the 5-character code each time.
The Publisher Window
Click the Steam glyph in the level editor toolbar to open the publisher window. It's organised top-to-bottom as a header, a preset bar, a recent-history strip, a tools row, the settings panel, and a bottom action bar.
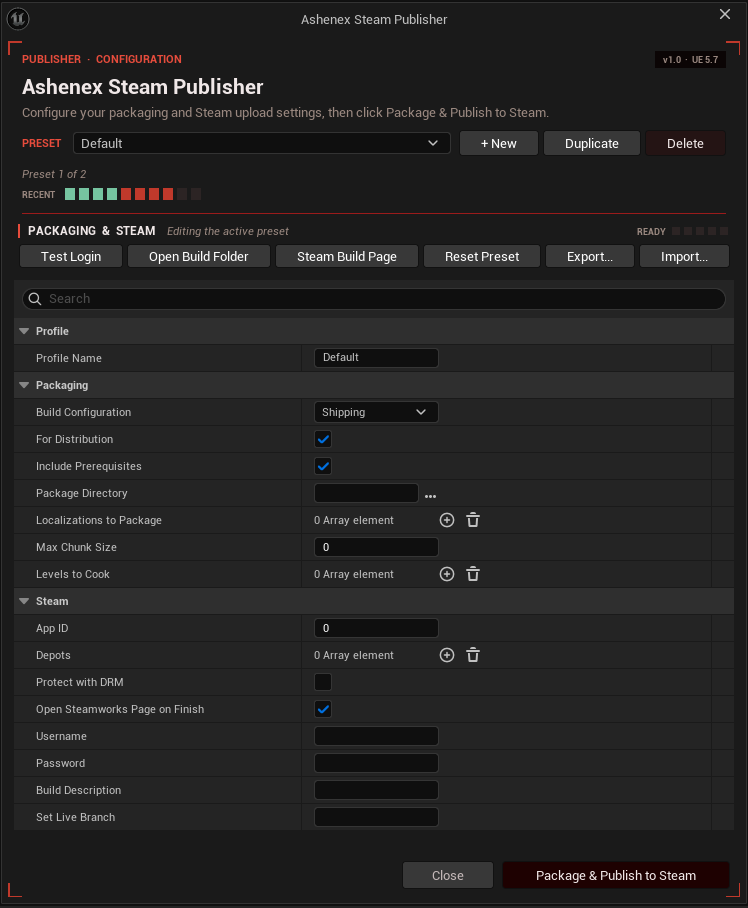
From top to bottom, the window provides:
Test Login, Open Build Folder, Steam Build Page, Reset Preset, Export, Import.Saved/Config/EditorPerProjectUserSettings.ini.The same settings are mirrored under Edit → Project Settings → Plugins → Ashenex Steam Publisher. Edits in either place affect the same underlying config file. Use Project Settings for quick single-field tweaks, the publisher window for the full pre-publish review.
Presets
Most teams have more than one publishing target. A Shipping build for the public branch, an Internal QA build that points at a separate Steam app, a Public Beta with relaxed validation. Ashenex Steam Publisher stores every configuration as a self-contained preset, switchable from the combobox at the top of the publisher window.
Each preset is a full snapshot of Packaging and Steam settings, including its own credentials. This means a project can target multiple Steam apps or use different builder accounts per branch without re-typing the username and password every time.
Preset N and can be renamed inline through the details panel.(Copy)), useful for spinning up a beta variant of an existing Shipping config.The plugin enforces unique preset names. If you rename a preset to a name that collides with another, or duplicate one whose copy name already exists, a numeric suffix is appended automatically and a toast notification explains what happened.
Existing projects upgraded from earlier single-config versions are migrated automatically on first run. Your previous settings become a preset named Default, and your subsequent presets are added alongside it.
Pre-Flight Summary
Click Package & Publish to Steam and the publisher window is replaced by a modal Pre-Flight Summary. It surfaces every critical field of the active preset one last time before the long-running build kicks off, so misconfigurations are caught before you start a 30-minute upload to the wrong branch.
The summary shows:
READY TO PUBLISH when every required field is filled, crimson BLOCKERS DETECTED when at least one is missing or invalid.default.Resolve Blockers to Continue. Disable for the legacy Continue Anyway behaviour.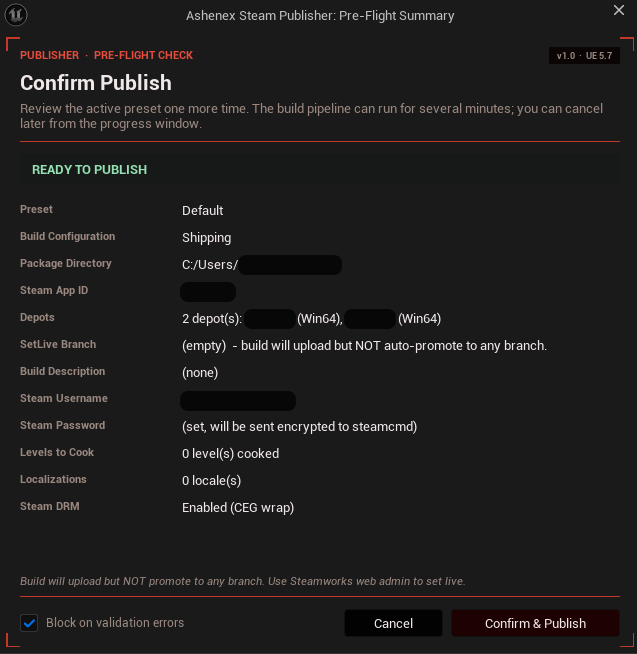
Blockers (missing AppID, no depots, empty credentials, default SetLive branch) will fail downstream anyway and waste your cook time. The hard gate stops the pipeline before it starts so you can fix the config instead of watching the build die at the Steam upload step.
Progress & Build History
When you confirm at Pre-Flight, the publisher window dismisses and a dedicated Progress window opens. It mirrors every phase of the pipeline live: cook, stage, package, Steam upload, set-live.
The Progress window provides:
steamcmd stdout with timestamps at each phase change. Steam username and password are redacted in the displayed text.steamcmd process), flips to Close on completion.Closing the window does not cancel the pipeline. The build continues in the background. Click the toolbar Steam glyph again to re-open the progress window and the pre-existing log, status, and progress are restored to where they left off.
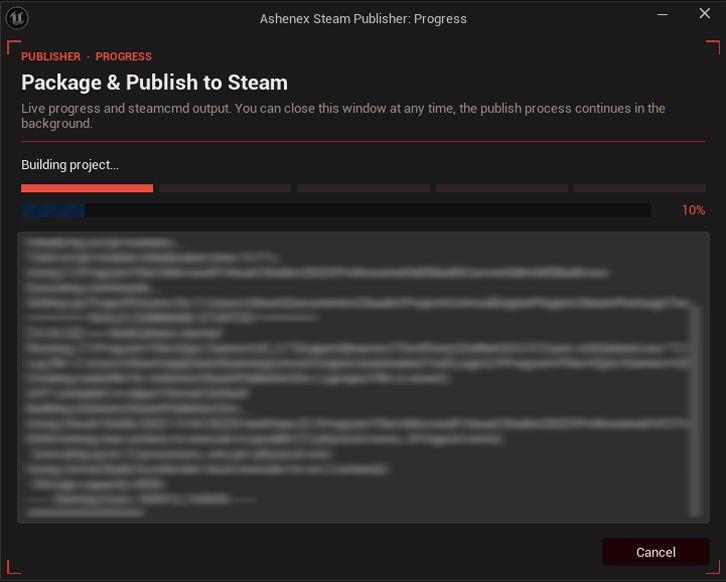
steamcmd with credentials redacted; closing the window doesn't kill the pipeline.Build History
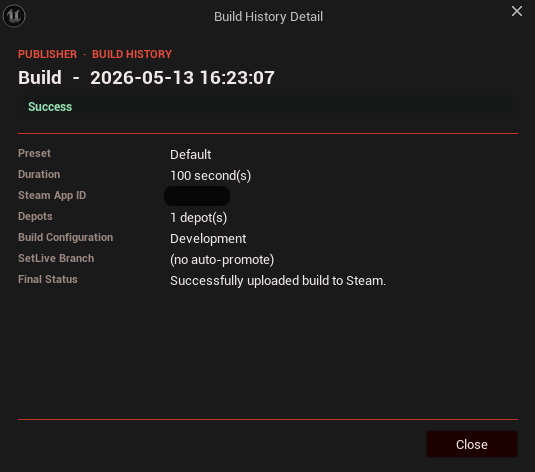
Each completed pipeline (success or failure) is recorded to the per-project Build History. The most recent 10 runs are surfaced as the RECENT strip near the top of the publisher window.
Hover any square for a quick tooltip (timestamp, profile name, duration, OK / FAILED). Click for a detail popover showing the full timestamp, outcome, AppID, depot count, build configuration, SetLive branch used, and the final status message. Older entries are dropped from the strip and from disk once the cap is reached.
Sample Configuration
A typical filled-in preset for a single-depot Windows shipping build looks like the following. Use these as starting values and adjust to your project's needs.
App ID 480 and depot 481 are Valve's public Spacewar test app, useful for verifying your setup before pointing at your real product. Real app IDs are assigned by Steamworks when you create your title.
If your title ships multiple depots (e.g. one for Windows, one for Mac, one for Linux), add each one to the Depots array and tag each with the correct platform. The plugin generates a depot_build_<ID>.vdf for each entry automatically and the FileMapping is platform-aware.
Leave this empty to upload without auto-promoting (use the Steamworks web admin to set live manually). Fill in any branch name you've created in Steamworks Builds, Manage Branches to have the plugin promote the build for you on successful upload. default is rejected at the editor layer; Valve disallows it from steamcmd and blocks the publish anyway, so use the Steamworks website for that case.
Settings Reference
Every setting exposed by a preset, grouped by section. Required fields must be filled in before publishing; Optional fields have safe defaults and can be left alone for a basic setup.
The display name for this preset (e.g. Shipping, Internal QA, Public Beta). Shown in the combobox at the top of the publisher window. If a name collides with an existing preset, a numeric suffix is added automatically.
Which build configuration your project is cooked with. Shipping is the correct choice for public Steam releases; Development is useful for internal QA branches.
Marks the build as a distribution package. When enabled, debug symbols (.pdb) are stripped from the output before upload. Recommended for any public release.
Bundles the Visual C++ / DirectX redistributables your title needs into the staged build. Required for end-user installs from Steam.
The folder where the cooked, staged, and packaged build is written before being uploaded to Steam. Pick somewhere with at least 2 to 3 times your build size in free space.
Which locales are cooked into the build. Leave empty to cook every culture your project supports, or add only the ones you want shipped (e.g. ship only English and Japanese for a launch build).
If greater than zero, sets a maximum size (in bytes) per pak chunk. Useful for keeping per-file sizes under platform limits or improving patch granularity. Leave at 0 for default behaviour.
Specific maps to include in the cook. Leave empty to cook everything referenced from your default level; populate to ship only the listed levels (e.g. excluding a test map directory).
The numeric Steam application ID assigned to your title by Valve when your Steamworks application was created.
One entry per depot you want to upload. Each entry has its own Depot ID (numeric, assigned by Steamworks), a target Platform (Windows / Mac / Linux), and an optional Install Script, a path to a .vdf file that runs install-time logic on the user's machine (registry keys, redist installers, etc.).
A short note that appears next to your build in Steamworks (e.g. v0.3.2 internal QA). Maps to the Desc slot in app_build.vdf. Max ~80 characters per Steam's rules.
If non-empty, the plugin promotes the build to this Steam branch automatically after upload. Maps to the SetLive slot in app_build.vdf. Leave empty to upload without flipping any branch. default is rejected by the editor; Valve disallows it from steamcmd as a safety measure. Allowed characters: A-Z, a-z, 0-9, hyphen, underscore.
If enabled, the plugin instructs steamcmd to wrap your shipped .exe with Valve's CEG DRM before upload. The DRM-wrap step can take ~15 minutes on Valve's side; the progress window will report it.
When the upload completes successfully, opens your app's build page on partner.steamgames.com in your default browser. Handy for promoting the build to a Steam branch right after upload.
Steam account used to authenticate the upload. Strongly recommended: a dedicated builder account under your Steamworks group rather than your personal Steam login. Per-preset, different presets can target different builder accounts.
Password for the builder account. Stored as a masked field in the editor UI but written in clear text to EditorPerProjectUserSettings.ini. Make sure that file is in your .gitignore and never committed. Redacted from every log line shown in the progress window.
Global preference (not per-preset). When on, the Pre-Flight Summary disables Confirm if any blockers are present. When off, the legacy Continue Anyway behaviour is preserved. Toggle inline from the bottom of the Pre-Flight Summary; persists between sessions.
Steam Guard & Troubleshooting
Every upload triggers Steam Guard two-factor authentication. The plugin handles this with a small popup window.
steamcmd reports it needs a Steam Guard code. The plugin detects this and pauses.steamcmd with the code and resumes the upload.The Tools row in the publisher window also includes a Test Login button. Clicking it spawns a one-shot steamcmd session that authenticates with the active preset's credentials and exits immediately, no upload, no build. Use it to verify a builder account is working before kicking off a long pipeline.
| Error / Symptom | Cause & Fix |
|---|---|
BLOCKERS DETECTED at Pre-Flight | One or more required fields are empty or invalid. Look at the crimson-painted rows in the Pre-Flight summary to identify which. |
Invalid Steam App ID | App ID is set to 0 or blank. Set your numeric Steam App ID in the publisher window. |
Empty Steam username / password | Builder credentials missing for the active preset. Fill in the Username and Password fields, or run Test Login first to verify them. |
Invalid package directory | Package Directory not set or unreadable. Pick a folder with write permissions and enough free space. |
No valid depot was specified | Depots array is empty. Add at least one entry with a valid Depot ID matching your Steamworks setup. |
| SetLive branch reverts to empty after edit | You entered default or a value containing spaces / special characters. The editor sanitizes these on edit; a toast explains what was stripped. To promote to default, leave this empty and use the Steamworks web admin instead. |
Wrong code. Please try again. | Steam Guard code mismatch. Re-open the popup and enter the latest code from your authenticator. |
Too many requests for Steam. Try again in an hour. | Steam rate-limited your account after repeated auth failures. Wait one hour before retrying. |
Packaging failed | The Unreal cook/package step failed before reaching Steam. Check the Output Log for the underlying error, usually a missing asset or a compile error. |
| Plugin downloads ~20 MB on first run | Expected. The plugin auto-downloads the latest steamcmd.zip from Valve's CDN to Plugins/AshenexSteamPublisher/Content/. Only happens once per install. |
| DRM wrap appears stuck | Steam's CEG DRM wrap can take ~15 minutes on Valve's side. The status line will indicate this while it runs. |
| Progress window closes but build keeps running | Intentional. The pipeline runs independently of the window. Re-open by clicking the toolbar Steam glyph; log, status, and progress are restored. |
All steamcmd stdout and stderr are mirrored into the Unreal Output Log under the AshenexSteamPublisher log category, and into the progress window's live log. Passwords and 2FA codes are redacted in both. If a notification message isn't enough to diagnose a failure, opening the Output Log and filtering on that category will give you the full trace.
Each failed run is recorded in the Build History strip with its final status message. Clicking the square opens a popover showing the AppID, depot count, build configuration, branch, and the exact error text. Useful for spotting patterns (e.g. "every Tuesday upload fails on the Linux depot").